Корзина
В вашей корзине больше ничего нет
- Новости
- 0 likes
- 1010 просмотров
- 0 comments
Pepper Mill Project
A pepper mill is always a very popular woodturning project, it is not difficult to make, and you end up with a really useful kitchen gadget. You will need to work accurately though, as the components must fit together well if it is to work properly. The main dilemma with a project like this that is bored through, is actually holding the work, but a chuck and a variety of jaws overcomes most of the problems. If you don't have a chuck you will have to make friction jam chucks to hold the various components.
To start with you will need a suitable pepper mill mechanism. These are available from most woodturning suppliers, and are sold in a variety of lengths.

Pepper Mill Mechanism
For this project I am using a 7” mechanism, Fig 1, but the principles are the same no matter what the length.

Fig 1
The Blank
You will also need a block of suitable timber, 2½” square section is a nice size for mills, and for this length of mill I started with a 9” blank Fig 2.

Fig 2
Mount the Blank
Cut the blank through to separate the base and top sections, and mount the base blank between centres, Fig 3.

Fig 3
Rough Out the Blank
Reduce this to a cylinder using a ¾” roughing gouge, Fig 4, with the lathe spinning at about 2000 rpm.

Fig 4
Cleaning Up
Then clean up the ends nice and square with the parting tool, Fig 5.

Fig 5
Remount in the Chuck
Now remount the blank in the chuck, bringing up the tailstock before you finally tighten the jaws to help line everything up, Fig 6. Keep track of the grain orientation of the base with the top if you want it to line up in the finished mill.

Fig 6
Bore the Blank
Now use a 1” sawtooth bit in the tailstock chuck to bore down the length of the blank, Fig
7. Run the lathe at about 500 rpm, and drill as far as you can from this end, but keep withdrawing the bit to clear the accumulated swarf.

Fig 7
Enlarge the Bore
Then open out the bore with a parting tool and skew chisel on its side, to accommodate the various bits of the fitting, Fig 8.

Fig 8
Fit the Plastic Sleeve
There is usually a plastic sleeve that holds the peppercorns and a wider retaining plate that must be sunk well into the end, Fig 9. You will have to keep stopping the lathe to get these various bits fitting snugly, there is no leeway for them to be loose.

Fig 9
Using Long Nosed Jaws
Attach long nosed jaws to the chuck ready to re-mount the workpiece, Fig 10.

Fig 10
Re-Mount the Work
Remove the work and turn it round, re-gripping on the long nosed chuck jaws. Provided the end has been faced off nice and square you only need push the wood over these jaws, Fig 11, and then open them out to get a really firm grip in the bore, and it should run true as well.

Fig 11
Complete the Bore
You can now complete the boring using the same 1” bit, Fig 12, the two holes should meet perfectly.

Fig 12
Trimming the Blank
Then trim the blank to the necessary length, Fig 13.

Fig 13
Creating the Body Shape
Carefully start to form the body shape, Fig 14.

Fig 14
Take Care to Not Foul the Chuck
You can work down close to the chuck, but leave the section right against it unfinished for now, Fig 15.

Fig 15
Finishing the First Section
Once all the other turning has been completed you can slacken off the chuck and just ease the pepper mill body away from the chuck a little to give you some clearance, Fig 16. This allows you to finish turning this little section. Sand and polish the body with whatever finish you prefer. I used 3 coats of Melamine flatted down well between coats.

Fig 16
The Top Section
Now you can turn the top section of the mill. Mount the other half of the blank between centres as before, Fig 17, again maintaining the grain orientation.

Fig17
Turning the Pin
Turn a short pin on one end to be a nice sliding fit in the top of the body, Fig 18. It needs to be tight enough so that there is no play, but the top must turn freely in the body.

Fig 18
Shape the Top
Then complete the shaping of the top, leaving a small nib at the headstock centre, Fig 19.

Fig 19
Shaping & Cleaning Up the Top
To hold the top for the rest of the shaping and drilling you can try and grip it in a chuck, but the pin is so short that it is unlikely that you will get a secure enough grip. A much better way is to turn a recess in a piece of scrap held on the screw chuck, Fig 20.

Fig 20
Insert the Top
Carefully push the top to the recess, ensuring it is a tight fit, Fig 21.

Fig 21
The Finished Shape
This will give you a really firm hold and allow you to clean up the end, Fig 22.

Fig 22
Finishing the Top
The top must be bored to take the spindle of the mechanism, I used a 3/16” twist drill in the tailstock chuck, Fig 23.

Fig 23
Applying a Finish
You can then sand and polish the top to match the body, Fig 24. A small bar inserted into the hole will help you lever the top out of the jam chuck when its finished.

Fig 24
Insert the Mechanism
All you have to do now is screw in the various bits of the mechanism, Fig 25.

Fig 25
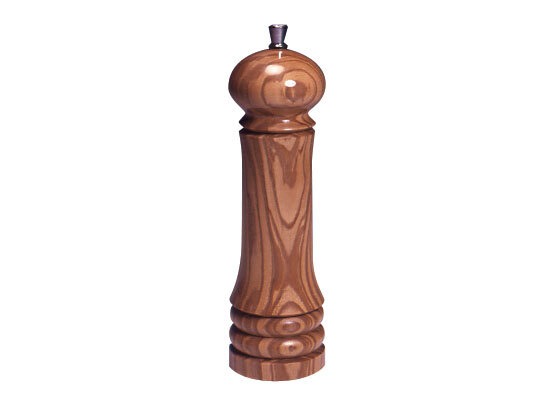
The Finished Article
Your pepper mill is now complete and ready for use, Fig 26.

Comments (0)