Woodcarving by Numbers with Mike Davies
The Acanthus Panel |
|
Please refer to the Significant Six Techniques tutorial or watch the Foundation Skills DVD for safety and guidance with your techniques.
Sweep Profile Reference Chart
|
|
.png)
|
|
The Acanthus Panel
Without doubt, the acanthus leaf is the most widely used plant motif in the decorative arts.
Its origins lie in the ancient Roman and Greek empires and have been traced back as far as the 5th Century BC. The Acanthus Mollis (Photo.1) is a Mediterranean plant which is also known by several names such as Bear’s Breeches or Brank Ursine. It was stylised in different ways for Greek, Roman, Byzantian and Gothic arts and has been in constant use since then.
Photos. 2,3 & 4 show examples of how the acanthus leaf has been stylised and used on carved furnishing. These examples are from my tutor’s workshop, where many fine examples were preserved to remind his students of the standards to which he wanted us to aspire.
During the Renaissance and the revival of classical Roman and Greek decoration, the acanthus leaf returned to it most favoured form and its presence spread wherever European tastes were adopted.
It is good practice to collect pictures of antique furniture, or architecture, to study how the leaf designs have been used. The leaf can often be seen carved in stone to decorate buildings in towns and cities, especially those of the 18th century. A photograph of these decorations can prove a valuable source of inspiration when developing designs of your own.
Drawing the Acanthus
Although the leaf, when drawn, may look like an extremely impressive piece of artwork, it is constructed in a logical series of stages by following a few simple rules. It is imperative to have an understanding of these basic principles which, in turn, will be replicated in the carvings.
Start the acanthus leaf with a primary line, which will become the centre stem and represent the path that the leaf will follow (Figs.2 & 3). This line forms the most important part of the entire illustration and all other lines must flow towards it in a graceful sweep.
The acanthus leaf is formed by a series of divisions, the first of which can be seen in Fig 4 which illustrates the leaf’s basic form. The familiar leaf shape has been broken down into three divisions.
Notice how each division is proportioned with the larger division in the centre and the two smaller divisions on either side. Also notice how every single line flows towards the centre which is absolutely critical for the leaf to appear correct.
|
The project - an acanthus panel
.png)
Photo 1.
Acanthus leaves
|
|
Two Areas of Study
When learning how to carve there are two distinct areas of study. The first area is the Foundation Skills (techniques) and the second is the Subject.
The Foundation Skills are the starting point where an aspiring woodcarver must begin. You focus on how to hold the tools correctly and how to use them with control at all times. You must become a master of creating and maintaining a razor sharp edge, along with other essential skills.
With a sound knowledge of these skills, they can then be applied to any Subject.
The Subject is the creation itself and this offers an infinite field of possibilities.
My specialty subject is classical ornamentation.This requires a study of classical architecture and furniture styles throughout the various periods in history.
Other carvers specialise in areas such as the study of anatomy, wildlife or in the case of this tutorial, woodturning. Regardless of the subject, the same foundation skills are required and this is where the Carving by Numbers system has found its niche.
In any of my carving seminars, I teach the Significant Six techniques.
Along with some proficiency in the techniques, you must also ensure that you have a razor sharp edge on your tools.
Carving with dull tools is a futile pursuit, one that can only lead to frustration. With a razor sharp cutting edge, your tools will glide through the timber with effortless sweeps.
These techniques can be found in dedicated tutorial or by watching the foundations skills dvd.
Planning a Carved/Turned Project
It is important to consider your desired outcome, prior to decorating a piece of turning with carving. The following offers examples of how carving can be incorporated into your turning:
• The turning can be used as a platform to
showcase the carving (Photo 5).
• The turning can be the template for the
carving but the turned form is
essentially lost in the final carving
(Photos 3 & 4). Here, the blank was
turned to give the circular outer shape and
centre of the sunflower, but
the subsequent carving removed most of the
original turned form.
• Carving can be used to highlight and define
the beauty of the turned form
(Photos 6, 7 & 8).
|
.png)
Photo 2.
Acanthus relief carving
.png)
Photo 3.
.png)
Photo 4.
Carved acanthus leaves on the capital of a column
Fig 2.
The acanthus leaf must always be based on a layout of primary lines (Top)
.png)
Fig 3.
The acanthus leaf must always be based on a layout of primary lines (Top)
.png)
Fig 4.
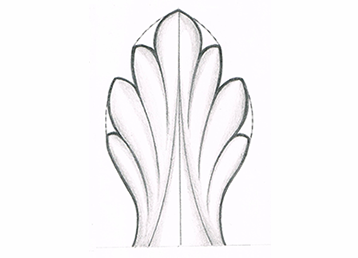
Fig 5.
The leaf can be broken into smaller divisions within the confines of the primary shape.
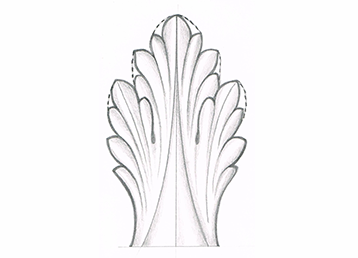
Fig 6.
Further division of the leaf
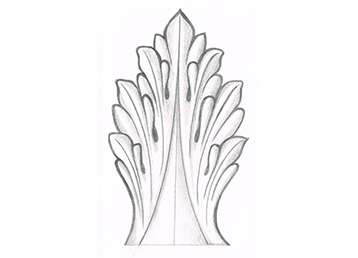
Fig 7.
A design based on dividing the sections into three
|
|
Fig 5 shows a design that now comprises seven components. The first and largest section has been divided into three while the smaller divisions on either side have been halved.
Note that the top leaf should always be made up of three divisions. Once again, observe that all lines drawn flow towards that centre line, and the component with three divisions forms a new primary shape.
In Fig 6 you can see the leaf divisions have been broken down once more. The top leaf is divided into three and the two smaller ones on either side are split into two. Note how the new details are drawn internally so as not to alter the basic outer shape. This enables the division to appear visually correct, giving the impression of overlapping components, helping with perspective and generating a three dimensional look.
Fig 7 demonstrates that to create the leaf with many sections divided into sets of three divisions is an attractive option. The basic outside shape is still exactly the same as the previous designs, with each internal line flowing towards the centre stem. Each group of three establishes its own primary shape and can be broken down still further if required.
Fig 8 shows an incorrectly designed leaf. The top leaf has been divided into three and the two components on either side into two. The problem is that the other lower components have also been divided into two, making the leaf appear clumsy. A useful tip is to avoid drawing two sets of two divisions next to each other.
To summarise, you can see how you should always start your design with the centre line (Figs.2 & 3), adding others for more complex leaves. Then fill in the leaf decoration working within the guidelines and remembering that all lines must flow to their central stems (Figs.4-7).
|

Photo 8.
An example of an incorrectly designed acanthus leaf
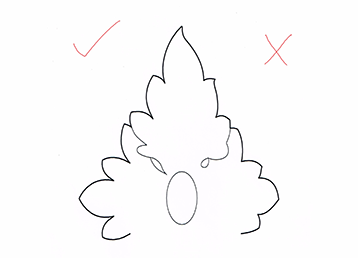
Photo 9.
All lines must flow towards the centre of each leaf
|
|
Please refer to the Significant Six Techniques tutorial or watch the Foundation Skills DVD for safety and guidance with your techniques.
|
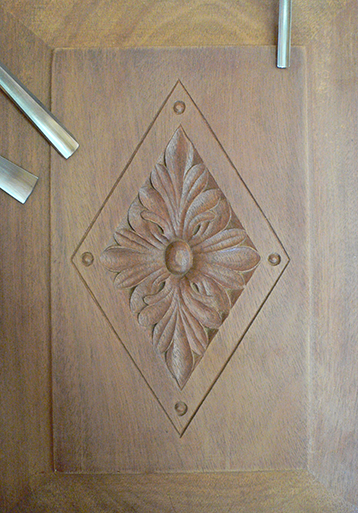
Project - An Acanthus Panel
This project provides an introduction to the most commonly used and traditional form of leaf decoration. It creates an attractive panel carving which can be incorporated into a multitude of applica tions. Some examples include chair backs, coffer sides, cupboard doors, jewellery box lids and even a stylish wall decoration. The acanthus leaf decoration shown here is fairly simple, but once you are confident and understand the principles of the leaf design it can be made more elaborate and used to decorate almost any area, whether flat or turned.
Photocopy or re-draw Fig 10 to scale. Each square of the grid should measure 20mm. This size has been chosen to make it easier to work with the standard set of carving tools used in this series of tutorials and shown in Fig 1. Once you have developed some familiarity with the design you may wish to enlarge or shrink the pattern to suit the specific requirements of your project. On the drawing, notice that all lines defining the outer edges of the leaves radiate in gentle sweeps towards the centre berry.
On the left hand side of Fig 9, you can see how the design is drawn correctly with all lines flowing towards the centre of each leaf. The right hand side has been drawn incorrectly, illustrating how the design can look out of balance if the lines of each division do not flow uniformly towards the centre line of each leaf. |
.png)
Photo 5.
A stiff card template makes it easier to transfer the design to the wood
.png)
Photo 6.
Setting in the V-line around the diamond shape
.png)
Photo 7.
Setting in the outline of the acanthus leaf
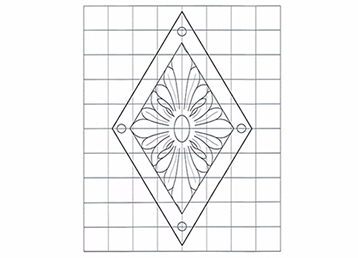
Fig 10.
.png)
Photo 8.
Defining the leaf design from the border using chamfers
.png)
Photo 9.
Cutting out the four eyelets in the design using tool #4
.png)
Photo 10.
Using tool #3 to remove the centre of the eyelet
|
|
Mark the design, including internal lines, onto the timber. This can be done using carbon paper. If you intend to carve numerous motifs, then it is useful to make a stencil from stiff card as illustrated in Photo 5. I have used a Mahogany for this project, but any suitable carving timber will be fine.
With carving tool #8 (see Fig 1), set in a V-line around the diamond shape which surrounds the acanthus leaves. Anchor the carving tool firmly to avoid unwanted slips (Photo 6).
Set in the outline of the acanthus design and the centre berry using the various carving tool profiles from your set. At this stage it is only necessary to mark the surface of the timber (Photo 7).
The next task is to define the leaf design from the surrounding timber, creating the illusion that the motif is placed on top of pre-cut chamfers. Using tool #1, carefully slice down to the lines you have previously set in. Deepen the cuts progressively as you work, ensuring that the surface line of the chamfer is perfectly straight (Photo 8).
Form the four eyelets (Photo 9), giving the impression that parts of the leaves overlap others. This helps to provide a sense of depth and a three dimensional appearance.
With tool #4, make a cut leading to where each eyehole is to be located. Cut towards it and remove a small segment of timber with tool #3 (Photo 10).
Define the form of the eyelets further by using a shaped punch (Photo 11). These punches can be made by simply filing the end of a nail or section of bar to the desired shape. You can then use the punch to clean up the shape of the recesses. This is a much easier method than trying to clean out the eyelets fully with cutting edge tools.
Use tool #3 to set in the four circles located in the diagonal border (Photo 12). Round over the wood inside the circle to form a berry, with tool #2. It is important that you avoid damaging the outer perimeter of the circle (Photo 13).
Slice down towards the larger oval shaped lozenge in the centre of the leaf design with tools #4 & #5.
Deepen the grove surrounding the lozenge to a depth of approx. 5-7mm and remove the waste.
Try to ensure that the walls of the lozenge are vertical to the surface of the timber. This will ensure that the dimension at the bottom of the lozenge remains the same as the top (Photo 14).
Round over the lozenge to form the centre berry with tools #4 & #5. Make sure that you anchor the carving tool and use the tapping technique (Photo 15 — at this point in the photography I had already jumped to the next step which is why some of the leaves have been scooped out).
Use tool #4 to scoop out the shape of the leaves between each line, working inwards towards the centre berry (Photo 16). Carve shallowly where the lines are close together and deeper where they are further apart.
|
.png)
Photo 11.
Homemade punches make it easier to clean up the small recesses of the eyelets
.png)
Photo 12.
Setting in the four circles in the border with tool #3
.png)
Photo 13.
Forming the berry with tool #2
.png)
Photo 14.
Defining the centre berry
.png)
Photo 15.
Rounding over the centre berry
.png)
Photo 16.
Scooping out the leaves
|
In Photo 17, note how the leaves appear to fall over each other, enhanced by the eyelet. Some of the original pencil lines should remain visible, forming ridges or high points which flow towards the centre berry. Remember to slide the carving tools as you work.
Divide the remaining flat sections with new pencil lines, ensuring that these, too, flow towards the centre berry (Photo 18). Scoop the timber between the lines with tool #3, creating another set of ridge lines which flow towards the centre (Photo 19). Gently sand the finished decoration, being diligent not to round over any details. |
.png)
Photo 17.
Overlapping the leaves
.png)
Photo 18.
Pencilling in the remaining leaves
.png)
Photo 19.
Carving the final leaves, removing all flat areas from the acanthus carving
|
Comments (0)