Корзина
В вашей корзине больше ничего нет
- Новости
- 0 likes
- 1017 просмотров
- 0 comments
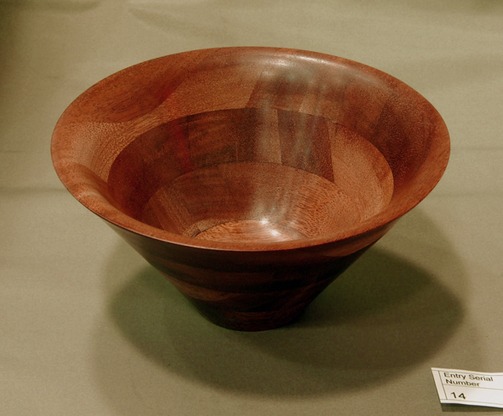
basic segmented bowl
This bowl was made for a friendly club competition out of a block of 3x3x8 wood. Any wood will suffice.

Step 1: Cutting the Block of Wood
First I cut the block into 9 8x1x1" inch rods.

Step 2: Glue the Rods Together
Then selecting different rods that were not naturally next to each other, I grouped them in 2 sets of 4 rods and glued those rods together to create 2 panels.

Step 3: Tidying the Blocks Up
Once the glue was dry lots of sanding followed to ensure the main top/bottom surfaces were completely flat and the 2 blocks would fit perfectly together down 1 side(you will see why in the next step).
Step 4: Marking the Panels with Circles
Once all the sides were sanded, I placed the two panels next to each other to form a 88 inch square. Using a compass I drew 4 circles roughly 3/4 inch apart starting from the largest circle .
Step 5: Cutting the Circles
Now the panels are moved to the bandsaw. The table had to be angled at roughly 45 degrees, so when cutting the circles thebottom ofone circle would sit onto the top of the small circle below. Hopefully the below picture highlights this.

Step 6: Gluing the Sections Together
6. Once the base circle is glued together and also glued onto a waste piece of wood to hold it into a chuck (see above picture), take this to the lathe and just ensure the top of the base is flat/level and then glue the next level of circle/ring onto the base. For added effect and to strengthen the bowl offset the join (join is where the two halves of the ring are glued together) of the first circle/ring with the base by 45 degrees. Compress the circle/ring onto the base using the tailstock to add pressure

Step 7: Finish Gluing
Repeat step 6 for all the circles/rings ensuring to level off each level prior to glueing to ensure you have a true fit.

Step 8: Finishing Off
8. Once you have glued each ring offsetting 45 per ring you are ready to refine the walls of the bowl, sand, finish and part off the bowl from the waste block of wood and you are finished.

Comments (0)