Iepirkumu grozs
Grozs ir tukšs
- Jaunumi
- 0 likes
- 3341 views
- 0 comments
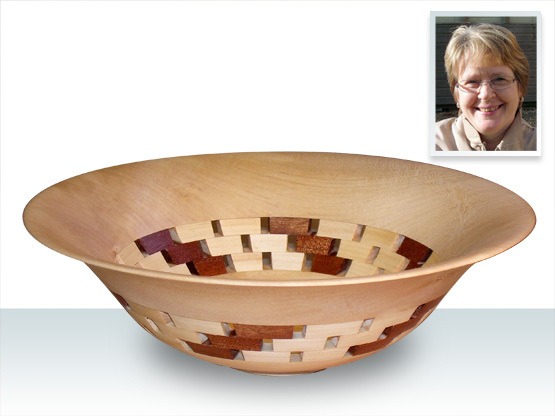
Atvērta segmentu bļoda
Šīs bļodas iedvesmas avots ir galerijas stila bļoda, kurā spraudņi tiek izmantoti, lai aizpildītu spraugu. Izmantojot trīs rindas atvērtu segmentu vietā spraudņiem, bļodas izskatu var krasi mainīt.
Bļodas sagataves salīmēšanu atvieglo atvērtu segmentu džiga, ko es izstrādāju īpaši šāda veida projektiem. (Pieejams manā tīmekļa vietnē www.sueharker.com).
Lai izgatavotu šo bļodu, jums būs nepieciešams bļodas sagatave, kuras diametrs ir aptuveni 10 (250 mm) un biezums 1 (32 mm), kā arī segmentiem – aptuveni 1 (32 mm) diametra un 5/16 (8 mm) biezuma koka sloksnes.
Trauka sagataves abām pusēm jābūt pilnīgi līdzenām, lai segmentus varētu pielīmēt; to var panākt, izmantojot trauka sagataves biezuma planēšanas mašīnu. Izurbjiet atvērumu, kas atbilst jūsu patronas izmēram, un nostipriniet trauka sagatavi virpā.

Trauka sagatavošana
Pagrieziet apaļā formā un noapaļojiet ārējo malu. Uzlieciet maskējošo lenti uz sagataves aizmugures; tai jānotur abas daļas kopā, lai varētu tās atdalīt. Atzīmējiet graudu izvietojumu un atdaliet, izmantojot 6 mm (1/4“) atdalīšanas instrumentu, sākot aptuveni 63 mm (2 ½”) no centra leņķī aptuveni 45º, vērstu uz ārējo malu. 
1. attēls
Pirmās rindas mērīšana
Novietojiet bļodas pamatni ar apakšpusi uz leju uz 18 segmentu paliktņa, izmantojot koncentriskos apļus, lai to centrētu. Izmēriet attālumu starp diviem “spieķiem”, kas ir nedaudz lielāks par bļodas pamatnes diametru. Šis mērījums ir katra segmenta platums, kas nepieciešams pirmajai rindai.
2. attēls
Otrās un trešās rindas mērīšana
Novietojiet bļodu ar augšu uz leju uz paliktņa un izmēriet attālumu starp diviem “spieķiem”, kas ir nedaudz mazāks par bļodas diametru. Tas ir trešajai rindai nepieciešamais segmenta platums. Otrajai rindai nepieciešamā segmenta izmērs tiek aprēķināts, izmantojot pirmās un trešās rindas izmērus. Piemēram, ja pirmā rinda ir 20 mm plata un trešā rinda ir 30 mm plata, otrā rinda tiks nogriezta 25 mm platumā. 
3. attēls
Novietojiet un nostipriniet atstarpes bloku vietā
Izmantojot galda zāģi, novietojiet upurējamo koka gabalu (starplikas bloku) gar ripas vadu. Izmēriet nepieciešamo segmenta platumu no starplikas bloka līdz asmeni. Nostipriniet ripas vadu šajā pozīcijā un nostipriniet starplikas bloku vietā. 
4. attēls
Nostādiet leņķa vadu uz 10
Nostādiet leņķa vadu uz 10º (nepieciešamais leņķis 18 segmentu riteņam). Novietojiet segmentu sloksni gar mitru tā, lai griežamā mala pieskartos atstarotājam. 
5. attēls
Rūpīgi nogrieziet segmentus
Piespiediet mitru stingri pret koku un pabīdiet koku cauri asmeni. Izmantojot stumšanas nūju, pabīdiet nogriezto segmentu prom no asmens. Apgrieziet koka sloksni un atkārtojiet procesu, līdz ir nogriezts nepieciešamais segmentu skaits. 
6. attēls
Ievietojiet pirmās segmentu rindas palīgierīcē
Nolīdziniet jebkādus plīsumus ar slīpēšanas bloku un ievietojiet segmentu rindu palīgierīcē.

7. attēls
Līmējiet pirmās segmentu rindas vietā
Uzklājiet līmi un novietojiet pamatni uz segmentiem, pārliecinoties, ka tā ir centrēta. Nostipriniet ar skavu, uzliekot spiedienu no augšas, un noņemiet lieko līmi. 
8. attēls
Līmējiet otrā un trešā segmentu rindas vietā
Novietojiet otro segmentu rindu uz riteņa un uzklājiet līmi, atstājot neklātu kanālu katra segmenta vidū. Turiet pamatni ar piestiprināto pirmo segmentu rindu virs segmentu riteņa un pagrieziet to par pusi segmenta platuma pa labi. Nostipriniet skavā un noņemiet lieko līmi. Kad līme uz otrajā rindā ir nožuvusi, pielīmējiet trešo segmentu rindu tādā pašā veidā. 
9. attēls
Nostipriniet bļodu
Novietojiet bļodas augšdaļu uz leņķa, pārliecinoties, ka tā atrodas centrā. Uzklājiet līmi uz segmentiem un, izmantojot iepriekš izveidotos graudu izvietojuma atskaites punktus, novietojiet bļodas pamatni uz bļodas augšdaļas. Nostipriniet ar skavu un noņemiet lieko līmi.

10. attēls
Piekariniet sagatavi pie patronas
Kad līme ir sacietējusi, parasti pēc 24 stundām, piekariniet gatavo sagatavi pie virpas, izmantojot iecirtumu trauka iekšpusē. 
11. attēls
Veidojiet trauka ārpusi
Iztaisnojiet trauka sagatavi un veidojiet ogī formas izliekumu. Veidojiet kājiņu un pārveidojiet padziļinājumu atkārtotai uzstādīšanai. Pirms noņemšanas no virpas noslīpējiet līdz galīgajai apdarei. Fig. 11 Fig. 12 Fig. 13 Fig. 14 Fig. 15 Fig. 16 Fig. 17 Fig. 18 Fig. 19 Fig. 20 Fig. 21 Fig. 22 Fig. 23 Fig. 24 Fig. 25 Fig. 26 Fig. 27 Fig. 28 Fig. 29
12. attēls
Iekšējās malas pagriešana
Atkārtoti uzstādiet bļodu un pagrieziet malu līdz vajadzīgajam biezumam. 
13. attēls
Segmentu izgriešana
Viegli noņemiet segmentu malas un turpiniet veidot bļodas iekšējo profilu. 
14. attēls
Eļļas uzklāšana
Kad ir panākta vajadzīgā forma, noslīpējiet ar smiltīm līdz piemērotam apdarei. Notīriet putekļus starp segmentiem un uzklājiet eļļu, pārliecinoties, ka segmentu gala šķiedras ir pārklātas. 
15. attēls
Noņemiet pēdas no skavas
Ievietojiet gatavo bļodu Cole vai jumbo skavās un noņemiet pēdas no skavas. 
16. attēls
Gatavā bļoda
Šeit mums ir gatava bļoda ar trim rindām atvērtu segmentu, kas izmantoti kā akcents. 
Comments (0)