Shopping Cart
There are no more items in your cart
- News
- 0 likes
- 1092 views
- 0 comments
|
Please refer to the Significant Six Techniques tutorial or watch the Foundation Skills DVD |
|
|
|
|
|
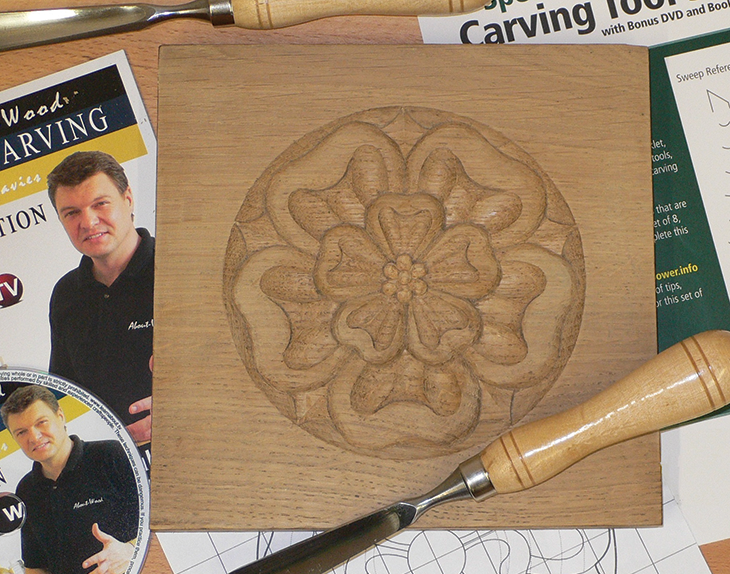
The Tudor rose is a decoration steeped in tradition and history. The rose has long held a symbolic place in decorative art in many countries, cultures and religions. Used to depict innocence, knowledge, peace and suffering as well as love, passion, secrecy and sacrifice, it is hardly surprising that this symbol of so many values became such a common heraldic motif and was, and still is, incorporated into furniture designs and used widely in architecture. |
|
|
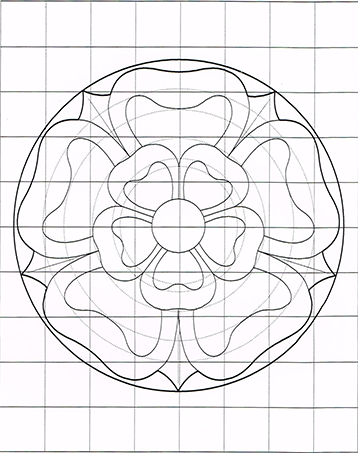
1. I have chosen to carve this design in oak, a common timber used in furniture from this period. Our first task is to mark the design onto your timber. To begin you will need to enlarge the drawing in Figure 1, so that each square of the grid measures 20mm. This can be done using a photocopier, or by enlarging a scanned image. Alternatively you can re-create the drawing by hand on your own grid. When the drawing is complete, you could make a cardboard template, or simply trace the design onto your timber using carbon paper, See photo 1. |
Photo 1. |
|
2. Use tool profile #’s 4,5 & 12 to set in the outside perimeter of the large rose petals, the small rose petals and the inner circle. You can also use profile # 5 to set in the barbs between the larger petals. Hold the carving tool using the Pinch position and make sure that the cut is set in at 90 degrees to the timber surface. Note how in Photo 2 & 3 the tool is angled so that the ‘bevel’ of the tool sets in a cut at 90 degrees to the timbers surface. |
|
|
3. Using profile #6 cut at 45 degrees from the outer circle to meet the set in cuts of the large rose petals and the barbs. Practice the sliding technique as you carve towards the ‘set in cuts’ and try to ensure that you remove all fragments of timber with each cut. You will need to ‘set in’ the vertical profile cuts of your petals several times until you achieve the desired depth of around 7mm. Remember to stay centrally located in front of your work. Hold the carving tool in the right hand to carve right and vice versa for the left, Photo 5. |
|
|
4. Next we need to shape the barbs. Mark a pencil line from the tip of the barb radiating towards the centre of the design. Then use profile #5 to slice down from the centre line to meet the edge of the larger petals. Then carve the barb in the opposite direction to form a high, straight ridge along the centre of each barb. Take a look at Photo 6 to see the required shape. |
|
| 5. Concentrate now on forming the large rose petals. In photo 7, see how profile # 4 is used to shape the inside of each of the larger petals. Create two scoops leaving a high ridge in the centre of each petal. Once this has been completed, do the same for the smaller petals with tool profiles # 2 & 3, Photo 8. |
|
|
6. Set in the inner curved line of each of the larger petals with tool profile #5. Then carve down towards the cut to clear the waste, Photo 9. |
|
|
|
|
|
8. Now take the scoop from the middle of each of the large petals with tool profile # 4. |
Photo 11. |
|
9. Complete the process for the smaller rose using tool profile# 2 or 3, Photo 12 |
Photo 12. |
| 10. With profile # 11, carve the area where the two petals of the larger rose meet to fall down towards the smaller rose Photo 13. Then do the same for the smaller rose petals where they fall away to the centre circle, Photo 14. |
Photo 13.
Photo 14. |
| 11. With profile #’s 8 & 1 create a ‘V’ line between each of the petals. This process can be seen in Photo 15 & 16. |
Photo 15. |
|
|
|
|
12. Now round over the edges of the petals using the various profiles from your collection as appropriate. Photo 17. Study the picture of the finished design Photo 22 to ensure that you achieve the correct shape. 13. To complete the design, set in a circle in the centre of the design with tool ref # 3, Photo 18. |
Photo 17.
Photo 18.
|
|
14. Create 6 or 8 equal divisions radiating out from the centre within the inner circle. |
Photo 19. |
|
16. Now with profile #1, set in the division lines for each of the segments and carve down towards the set in cut at 45 degrees. This should create a series of valleys that radiate towards the centre, Photo 20. |
Photo 20.
Photo 21. |
| 17. Use profile #2 to round over each of the seeds, and profile #1 to assist with cleaning the work as you go. Finally, a light sanding may be required to perfect the shape and lines of your decoration. However, be careful not to lose the definition of your chisel work. |
Photo 22. |
.png)
.png)
.png)
.png)
.png)
.png)
.png)
.png)
.png)
.png)
.png)
.png)
.png)
.png)
.png)
.png)
.png)
.png)
.png)
.png)
.png)
.png)
.png)
Comments (0)